|
previous tutorial |
ACG Home |
Instructor Home |
Class Home |
list of tutorials |
next tutorial |
- Initial set up
- Copy your files (done in the previous lab session) from your disk to a new folder on the desktop of the hard drive. Eject your disk.
- Make sure your Classmates document (the one you created in FreeHand), and all the photo files are in the same folder.
- Double-click on the Classmates file icon on the hard drive to launch FreeHand.
- If FreeHand won't start up automatically, drag your document icon and drop it on FreeHand's icon.
- Add missing files (if any) to Classmates document.
- Log on to the file server and find the class folder. Note: this is only possible if you are in the ACG computer lab.
- Open "Take" folder for the Classmates project, compare with what you have on your own disk. Drag to your folder on the desktop any files you are missing.
- Drag the file server icon to the Trash.
- In FreeHand, use File-->Import to import missing bios and photos.
- If you wish to make optional exposure adjustments to the imported photographs:
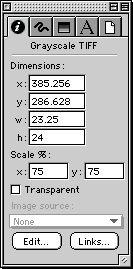
- Make sure the Inspector palette is visible (Window menu) and extended. Click the Object Inspector icon (the leftmost in the top row). Use the arrow tool to select a photograph.
- Click the 'Edit' button at the bottom of the palette. Use the lightness and contrast scroll bars to adjust the photo.
- Click 'Apply' to check the effect of your corrections.
- Click 'Reset' to return to initial settings.
- Click 'OK' when satisfied.
- Note that these adjustments won't be possible (and the 'Edit' button won't be available) if the photo was not saved as a grayscale TIFF file by the person who scanned it.
- Duplicate your prototype page
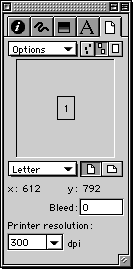
- Make sure the Inspector palette is visible and extended.

- Click the Document Inspector icon (the rightmost one in the top row).
- Click the middle Pasteboard Magnification icon (to the right of the Options menu).
- Check that the prototype page contains only the items (text blocks and pictures) which you want as part of the layout. Be especially careful about partial overlaps of items not visible in Preview mode--switch to Keyline mode (using the menu at the bottom of the document window) to make sure.
- Use the Duplicate command in the Options menu of the Document Inspector as many times as needed to accommodate all the students, one to each page.
- Position bio and photo on each student's page.
- As you duplicate the prototype page, the text and photo used to mock-up the design are duplicated as well. For each page, you want to replace the prototype text and photo with the text and photo provided by the student assigned to that page.
- To replace the prototype text:
- Use the text tool to place the insertion point in the student's text for the new page.
- Use Edit-->Select-->All to select all of the text, and Edit-->Copy to replicate it into the Clipboard.
- Use the text tool to place the insertion point in the prototype text already on the new page.
- Use Edit-->Select-->All to select all of the text, and Edit-->Paste to replace it with the contents of the Clipboard.
- To replace the prototype photo:
- Use the arrow tool to select the frame of the prototype photo already on the new page.
- Use Edit-->Cut Contents to pull the prototype photo out of the frame, then press the Delete key to remove the prototype photo.
- Use the arrow tool to select the student's photo for the new page. Drag it so it overlaps the frame on the new page.
- If the photo is too big to fit the frame, resize the photo by dragging one of its corner handles while holding down the Shift key (the Shift key prevents non-proportional scaling, which would distort the countenance of your classmate).
- Alternatively, you can resize the photo using the Object Inspector:

- Type a scale ratio in the "Scale %" fields: 100% is actual size, anything less will shrink the picture.
- Use the same percentage in both 'x' and 'y' fields to avoid distortion.
- Press the 'Enter' key to apply the new scale settings.
- Make sure not to enlarge the photos, since doing so lowers their resolution.
- Use Edit-->Cut to move the photo to the Clipboard.
- Use the arrow tool to again select the frame on the new page, then use Edit-->Paste Inside to place the contents of the Clipboard in the frame.
- Note: if the prototype photo is not inside a frame, you can simply delete it and drag the new student's picture to the same location on the page. You will have to manually ensure that the new photo is sized and positioned accurately.
- If you change your mind about your design:
- After you duplicate the prototype page, any and all changes are much more time-consuming since they must be repeated for every page. There is also a chance that some pages may end up being different from the others. To keep your publication consistent, you can use guides and styles.
- Nonprinting guides can be added to all pages at once, and can assist in maintaining a consistent layout.
- View-->Guides-->Edit; click 'Add'.
- Select guides' orientation ("Horizontal" or "Vertical"), number ("Count") or spacing ("Increment") and location ("Position").
- Enter the range of pages created in the previous step, so that all will have the same guides.
- In the View menu, make sure the following are checked: Guides-->Show, Guides-->Lock, and Snap To Guides.
- Once defined, type styles can quickly apply multiple formatting commands to text. Revisions are also faster because you simply redefine the style. Finally, styles assist in maintaining consistent type format.
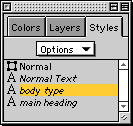
- Make sure the Styles palette is visible and extended (Window menu).
- Use the text tool to select the text you want to mark up with a sylesheet. Use the commands in the top section of the Text menu to format text as desired.
- While the text you just formatted is still selected, use the New command in the Options menu of the Styles palette.

- Double-click the default name of the new style and enter a descriptive name. Press the Enter key so that the new name is accepted.
- Typically, you will want one style for the students' names and a second one for their bios.
- To apply the styles you defined to text in the following pages:
- Select the text (with the text tool), then click on the name of the style in the Styles palette.
- Note that only the styles with an 'A' icon to the left of their names are intended for typographic formatting.
- To redefine the styles (automatically changing text appearance in all pages):
- Deselect all (Edit-->Select-->None), then click on the name of the style in the Styles palette.
- Use the Edit command in the Options menu of the Styles palette, choose new typographic attributes.
- Save your files
- Before leaving, copy your FreeHand file and all student files to your Zip disks (you can overwrite the older versions). You will need to turn them in later for grading.
|
previous tutorial |
return to top |
next tutorial |